VPN:
VPN英文全称(Virtual Private Network),中文译为:虚拟私人网络,又称为虚拟专用网络,用于在不安全的线路上安全的传输数据。
OpenVPN:
一个实现VPN的开源软件,OpenVPN 是一个健壮的、高度灵活的 VPN 守护进程。它支持 SSL/TLS 安全、Ethernet bridging、经由代理的 TCP 或 UDP 隧道和 NAT。另外,它也支持动态 IP 地址以及DHCP,可伸缩性足以支持数百或数千用户的使用场景,同时可移植至大多数主流操作系统平台上。
官网:https://openvpn.net
GitHub地址:https://github.com/OpenVPN/openvpn
示意图:

openvpn搭建注意事项
- vars文件路径,要与easyrsa命令同级目录。
- CA的私钥和openvpn server的私钥一定要收好,切不可外传。
- CA的私钥与公钥:/etc/openvpn/easy-rsa/3.0.3/pki/private/ca.key /etc/openvpn/easy-rsa/3.0.3/pki/ca.crt
- openvpn server的私钥与公钥:/etc/openvpn/easy-rsa/3.0.3/pki/private/server.key /etc/openvpn/easy-rsa/3.0.3/pki/issued/server.crt
- 客户端的私钥与公钥:/etc/openvpn/client/easy-rsa/3.0.3/pki/private/martinhe.key /etc/openvpn/easy-rsa/3.0.3/pki/issued/martinhe.crt
- 打包发送给用户的只有CA的公钥,server的公钥,客户端的私钥和客户端的公钥。
- 服务端与客户端配置文件,通信协议与接口类型必须与server一致。
- 证书的后期管理,员工入职签法证书和离职吊销证书,证书自动过期,通常设置两个月有效期。
openvpn基础环境:
环境信息:
操作系统版本:CentOS Linux release 7.6.1810 (Core)
openvpn server:172.20.132.59-桥接 172.16.36.133-仅主机
web-server1:172.16.36.10
web-server1:172.16.36.11
安装openvpn:(基于aliyun-epel)
~]# yum install openvpn easy-rsa -y
~]# rpm -ql easy-rsa
~]# rpm -ql openvpn
copy配置文件:
~]# cp /usr/share/doc/openvpn-2.4.7/sample/sample-config-files/server.conf /etc/openvpn/
~]# cp -r /usr/share/easy-rsa/ /etc/openvpn/
~]# cp /usr/share/doc/easy-rsa-3.0.3/vars.example /etc/openvpn/easy-rsa/3.0.3/vars
~]# tree #当前目录结构
.
├── easyrsa
├── openssl-1.0.cnf
├── vars
└── x509-types
├── ca
├── client
├── COMMON
├── san
└── server
1 directory, 8 files
创建PKI和CA签发机构:
3.0.3]# pwd
/etc/openvpn/easy-rsa/3.0.3

3.0.3]# ./easyrsa init-pki
Note: using Easy-RSA configuration from: ./vars
init-pki complete; you may now create a CA or requests.
Your newly created PKI dir is: /etc/openvpn/easy-rsa/3.0.3/pki

3.0.3]# ll pki/
total 0
drwx------ 2 root root 6 Jun 24 18:23 private
drwx------ 2 root root 6 Jun 24 18:23 reqs
创建CA机构:
3.0.3]# ./easyrsa build-ca nopass
Note: using Easy-RSA configuration from: ./vars
Generating a 2048 bit RSA private key
...................+++
..................................................+++
writing new private key to '/etc/openvpn/easyrsa/
3.0.3/pki/private/ca.key.clJbjlUXax'
-----
You are about to be asked to enter information that will be incorporated
into your certificate request.
What you are about to enter is what is called a Distinguished Name or a DN.
There are quite a few fields but you can leave some blank
For some fields there will be a default value,
If you enter '.', the field will be left blank.
-----
Common Name (eg: your user, host, or server name) [Easy-RSA CA]:
CA creation complete and you may now import and sign cert requests.
Your new CA certificate file for publishing is at:
/etc/openvpn/easy-rsa/3.0.3/pki/ca.crt

3.0.3]# ll pki/ca.crt
-rw------- 1 root root 1172 Jun 24 18:31 pki/ca.crt
创建服务端证书(私钥):
3.0.3]# ./easyrsa gen-req server nopass
Note: using Easy-RSA configuration from: ./vars
Generating a 2048 bit RSA private key
...............+++
.......................................+++
writing new private key to '/etc/openvpn/easyrsa/
3.0.3/pki/private/server.key.S6B0lFFmR9'
-----
You are about to be asked to enter information that will be incorporated
into your certificate request.
What you are about to enter is what is called a Distinguished Name or a DN.
There are quite a few fields but you can leave some blank
For some fields there will be a default value,
If you enter '.', the field will be left blank.
-----
Common Name (eg: your user, host, or server name) [server]:
Keypair and certificate request completed. Your files are:
req: /etc/openvpn/easy-rsa/3.0.3/pki/reqs/server.req
key: /etc/openvpn/easy-rsa/3.0.3/pki/private/server.key

3.0.3]# ll ./pki/private/ #验证CA证书
total 8
-rw------- 1 root root 1704 Jun 24 18:31 ca.key
-rw------- 1 root root 1708 Jun 24 18:41 server.key

3.0.3]# ll ./pki/reqs/
total 4
-rw------- 1 root root 887 Jun 24 18:41 server.req
签发服务端证书:
生成服务端crt公钥
3.0.3]# ./easyrsa sign server server
Note: using Easy-RSA configuration from: ./vars
You are about to sign the following certificate.
Please check over the details shown below for accuracy. Note that this request
has not been cryptographically verified. Please be sure it came from a trusted
source or that you have verified the request checksum with the sender.
Request subject, to be signed as a server certificate for 3650 days:
subject=
commonName = server
Type the word 'yes' to continue, or any other input to abort.
Confirm request details: yes #输入yes进行下一步
Using configuration from ./openssl-1.0.cnf
Check that the request matches the signature
Signature ok
The Subject's Distinguished Name is as follows
commonName :ASN.1 12:'server'
Certificate is to be certified until Jun 21 10:44:05 2029 GMT (3650 days)
Write out database with 1 new entries
Data Base Updated
Certificate created at: /etc/openvpn/easy-rsa/3.0.3/pki/issued/server.crt

#验证生成的服务端公钥
3.0.3]# ll /etc/openvpn/easy-rsa/3.0.3/pki/issued/server.crt
-rw------- 1 root root 4552 Jun 24 18:44 /etc/openvpn/easyrsa/
3.0.3/pki/issued/server.crt
创建 Diffie-Hellman:
https://www.cnblogs.com/hyddd/p/7689132.html
密钥交换方法,由惠特菲尔德·迪菲(Bailey Whitfield Diffie)、马丁·赫尔曼(Martin Edward Hellman)于1976年发表。它是一种安全协议,让双方在完全没有对方任何预先信息的条件下通过不安全信道建立起一个密钥,这个密钥一般作为“对称加密”的密钥而被双方在后续数据传输中使用。DH数学原理是base离散对数问题。做类似事情的还有非对称加密类算法,如:RSA。其应用非常广泛,在SSH、VPN、Https…都有应用,勘称现代密码基石。
3.0.3]# ./easyrsa gen-dh
Note: using Easy-RSA configuration from: ./vars
Generating DH parameters, 2048 bit long safe prime, generator 2
This is going to take a long time
.....+...................................................................+.
..+...+...................................................++*++*
DH parameters of size 2048 created at /etc/openvpn/easy-rsa/3.0.3/pki/dh.pem

#验证生成的秘钥文件:
3.0.3]# ll /etc/openvpn/easy-rsa/3.0.3/pki/dh.pem
-rw------- 1 root root 424 Jun 24 18:46 /etc/openvpn/easy-rsa/3.0.3/pki/dh.pem
到此服务端配置完成,下面是配置客户端
创建客户端证书:
复制客户端配置文件:
3.0.3]# cp -r /usr/share/easy-rsa/ /etc/openvpn/client/easy-rsa
3.0.3]# cp /usr/share/doc/easy-rsa-3.0.3/vars.example
/etc/openvpn/client/easy-rsa/vars
#生成pki目录
easy-rsa]# cd /etc/openvpn/client/easy-rsa/3.0.3
3.0.3]# ./easyrsa init-pki
init-pki complete; you may now create a CA or requests.
Your newly created PKI dir is: /etc/openvpn/client/easy-rsa/3.0.3/pki
#验证pki目录
3.0.3]# ll ./pki/
total 0
drwx—— 2 root root 6 Jun 24 18:52 private
drwx—— 2 root root 6 Jun 24 18:52 reqs
3.0.3]# ll ./pki/private/
total 0
3.0.3]# ll ./pki/reqs/
total 0
#生成客户端证书
3.0.3]# pwd
/etc/openvpn/client/easy-rsa/3.0.3
3.0.3]# ./easyrsa gen-req martinhe nopass #客户证书为martinhe,没有设置密码(生产环境设置相应密码)
Generating a 2048 bit RSA private key
..........................+++#此处省略N行
.+++
writing new private key to '/etc/openvpn/client/easyrsa/
3.0.3/pki/private/martinhe.key.nhIF7zKt5d'
-----
You are about to be asked to enter information that will be incorporated
into your certificate request.
What you are about to enter is what is called a Distinguished Name or a DN.
There are quite a few fields but you can leave some blank
For some fields there will be a default value,
If you enter '.', the field will be left blank.
-----
Common Name (eg: your user, host, or server name) [martinhe]:
Keypair and certificate request completed. Your files are:
req: /etc/openvpn/client/easy-rsa/3.0.3/pki/reqs/zhangshijie.req
key: /etc/openvpn/client/easy-rsa/3.0.3/pki/private/zhangshijie.key

3.0.3]# tree /etc/openvpn/client/easy-rsa/3.0.3/pki/
/etc/openvpn/client/easy-rsa/3.0.3/pki/
├── private
│ └── martinhe.key
└── reqs
└── martinhe.req
2 directories, 2 files
签发客户端证书:
3.0.3]# pwd
/etc/openvpn/client/easy-rsa/3.0.3

3.0.3]# cd /etc/openvpn/easy-rsa/3.0.3/

3.0.3]# pwd
/etc/openvpn/easy-rsa/3.0.3

#导入req文件
3.0.3]# ./easyrsa import-req /etc/openvpn/client/easyrsa/3.0.3/pki/reqs/martinhe.req martinhe
Note: using Easy-RSA configuration from: ./vars
The request has been successfully imported with a short name of: martinhe
You may now use this name to perform signing operations on this request.

#签发客户端证书:
3.0.3]# ./easyrsa sign client martinhe
Note: using Easy-RSA configuration from: ./vars
You are about to sign the following certificate.
Please check over the details shown below for accuracy. Note that this request has not been cryptographically verified. Please be sure it came from a trusted
source or that you have verified the request checksum with the sender.
Request subject, to be signed as a client certificate for 3650 days:
subject=
commonName = martinhe
Type the word 'yes' to continue, or any other input to abort.
Confirm request details: yes
Using configuration from ./openssl-1.0.cnf
Check that the request matches the signature
Signature ok
The Subject's Distinguished Name is as follows
commonName :ASN.1 12:'martinhe'
Certificate is to be certified until Jun 21 11:13:05 2029 GMT (3650 days)
Write out database with 1 new entries
Data Base Updated
Certificate created at: /etc/openvpn/easy-rsa/3.0.3/pki/issued/martinhe.crt

#验证签发后的crt证书:
3.0.3]# ll /etc/openvpn/easyrsa/3.0.3/pki/issued/zhangshijie.crt
-rw------- 1 root root 4445 Jun 24 19:13 /etc/openvpn/easyrsa/3.0.3/pki/issued/martinhe.crt
复制证书到server目录:
3.0.3]# mkdir /etc/openvpn/certs
3.0.3]# mkdir /etc/openvpn/certs
3.0.3]# cd /etc/openvpn/certs/
certs]# cp /etc/openvpn/easy-rsa/3.0.3/pki/dh.pem .
certs]# cp /etc/openvpn/easy-rsa/3.0.3/pki/ca.crt .
certs]# cp /etc/openvpn/easy-rsa/3.0.3/pki/issued/server.crt .
certs]# cp /etc/openvpn/easy-rsa/3.0.3/pki/private/server.key .
certs]# tree
.
├── ca.crt
├── dh.pem
├── server.crt
└── server.key
0 directories, 4 files
客户端公钥与私钥:
certs]# mkdir /etc/openvpn/client/martinhe
certs]# cp /etc/openvpn/easy-rsa/3.0.3/pki/ca.crt /etc/openvpn/client/martinhe/
certs]# cp /etc/openvpn/easyrsa/3.0.3/pki/issued/martinhe.crt /etc/openvpn/client/martinhe/
certs]# cp /etc/openvpn/client/easyrsa/3.0.3/pki/private/martinhe.key /etc/openvpn/client/martinhe/
certs]# tree /etc/openvpn/client/martinhe
/etc/openvpn/client/martinhe/
├── ca.crt
├── martinhe.crt
└── martinhe.key
0 directories, 3 files
server端配置文件:
~]# vim /etc/openvpn/server.conf
local 172.20.132.59 #本机监听IP

port 1194 #端口

# TCP or UDP server?
proto tcp #协议,指定OpenVPN创建的通信隧道类型

#proto udp

#dev tap:创建一个以太网隧道,以太网使用tap

dev tun:创建一个路由IP隧道,互联网使用tun
一个TUN设备大多时候,被用于基于IP协议的通讯。一个TAP设备允许完整的以太网帧通过Openvpn隧道,因此提供非ip协议的支持,比如IPX协议和AppleTalk协议
A TUN device is used mostly for VPN tunnels where only IP-traffic is used. A TAP device allows full Ethernet frames to be passed over the OpenVPN tunnel. hence providing support for non-ip based protocols such as IPX and AppleTalk.

#dev-node MyTap #TAP-Win32适配器。非windows不需要

#topology subnet #网络拓扑,不需要配置

server 10.8.0.0 255.255.255.0 #客户端连接后分配IP的地址池,服务器默认会占用第一个IP 10.8.0.1

#ifconfig-pool-persist ipp.txt #为客户端分配固定IP,不需要配置

#server-bridge 10.8.0.4 255.255.255.0 10.8.0.50 10.8.0.100 #配置网桥模式,不需要

push " route 172.16.0.0 255.255.0.0" #给客户端生成的静态路由表,下一跳为openvpn服务器的10.8.0.1
push " route 10.20.36.0 255.255.255.0"

;client-config-dir ccd #为指定的客户端添加路由,改路由通常是客户端后面的内网网段而不是服务端的,也不需要设置

;route 192.168.40.128 255.255.255.248

;client-config-dir ccd

;route 10.9.0.0 255.255.255.252
;learn-address ./script #运行外部脚本,创建不同组的iptables 规则,不配置
;push "redirect-gateway def1 bypass-dhcp" #启用后,客户端所有流量都将通过VPN服务器,因此不需要配置

#;push "dhcp-option DNS 208.67.222.222" #推送DNS服务器,不需要配置

#;push "dhcp-option DNS 208.67.220.220"

client-to-client #运行不同的client直接通信

;duplicate-cn #多个用户共用一个账户,一般用于测试环境,生产环境都是一个用户一个证书

keepalive 10 120 #设置服务端检测的间隔和超时时间,默认为每 10 秒 ping一次,如果 120 秒没有回应则认为对方已经 down

#tls-auth /etc/openvpn/server/ta.key 0 #可使用以下命令来生成:openvpn –genkey –secret ta.key #服务器和每个客户端都需要拥有该密钥的一个拷贝。第二个参数在服务器端应该为’0’,在客户端应该为’1’

cipher AES-256-CBC #加密算法

;compress lz4-v2 #启用压缩
;push "compress lz4-v2"
;comp-lzo #旧户端兼容的压缩配置,需要客户端配置开启压缩

;max-clients 100 #最大客户端数,可加大数值

;user nobody #运行openvpn服务的用户和组
;group nobody

persist-key #久化选项可以尽量避免访问那些在重启之后由于用户权限降低而无法访问的某些资源
persist-tun

status openvpn-status.log #openVPN状态记录文件,每分钟会记录一次
#;log openvpn.log #日志记录方式和路径,log会在openvpn启动的时候清空日志文件

log-append /var/log/openvpn/openvpn.log #重启openvpn后在之前的日志后面追加新的日志

verb 3 #设置日志级别,0-9,级别越高记录的内容越详细,
mute 20 #相同类别的信息只有前20条会输出到日志文件中
explicit-exit-notify 1 #通知客户端,在服务端重启后可以自动重新连接,仅能用于udp模式

#创建日志目录
~]# mkdir /var/log/openvpn

#修改目录属主属组
~]# chown nobody.nobody /var/log/openvpn/
最终配置:
[root@haproxy2 3.0.3]# grep "^[a-Z]" /etc/openvpn/server.conf
local 172.20.132.59
port 1194
proto tcp
dev tun
ca /etc/openvpn/certs/ca.crt
cert /etc/openvpn/certs/server.crt
key /etc/openvpn/certs/server.key  # This file should be kept secret
dh /etc/openvpn/certs/dh.pem
server 10.8.0.0 255.255.255.0
push "route 172.16.0.0 255.255.0.0"
client-to-client
keepalive 10 120
cipher AES-256-CBC
max-clients 1000
user nobody
group nobody
persist-key
persist-tun
status openvpn-status.log
log-append  /var/log/openvpn/openvpn.log
verb 9
mute 20
客户端配置文件:
~]# cd /etc/openvpn/client/zhangshijie
martinhe]# grep -Ev "^(#|$|;)" /usr/share/doc/openvpn-2.4.7/sample/sample-config-files/client.conf > /etc/openvpn/client/martinhe/client.ovpn

#最终客户端配置内容:
~]# cat /etc/openvpn/client/martinhe/client.ovpn
client
remote 172.20.132.59 1194
proto tcp
resolv-retry infinite
dev tun
nobind
auth-nocache    #内存不缓存密码信息
persist-key
persist-tun
ca ca.crt
cert martinhe.crt
key martinhe.key
remote-cert-tls server
cipher AES-256-CBC
verb 9

#验证当前目录:
3.0.3]# tree /etc/openvpn/client/martinhe/
/etc/openvpn/client/martinhe/
├── ca.crt
├── client.ovpn
├── martinhe.crt
├── martinhe.key
└── martinhe.tar.gz

0 directories, 5 files
启动openvpn服务:
~]# systemctl stop firewalld
~]# systemctl disable firewalld
~]# yum install iptables-services iptables -y
~]# systemctl enable iptables.service
Created symlink from /etc/systemd/system/basic.target.wants/iptables.service to /usr/lib/systemd/system/iptables.service.
~]# systemctl start iptables.service

#清空已有规则
~]# iptables -F
~]# iptables -X
~]# iptables -Z
~]# iptables -t nat -F
~]# iptables -t nat -X
~]# iptables -t nat -Z

#开启路由转发功能:
~]# vim /etc/sysctl.conf
~]# sysctl -p
net.ipv4.ip_forward = 1

#创建iptables 规则:
~]# iptables -t nat -A POSTROUTING -s 10.8.0.0/16 -j
MASQUERADE
~]# iptables -A INPUT -p TCP --dport 1194 -j ACCEPT
~]# iptables -A INPUT -m state --state ESTABLISHED,RELATED -j ACCEPT
~]# service iptables save
iptables: Saving firewall rules to /etc/sysconfig/iptables:[ OK ]

#验证防火墙规则:
[root@haproxy2 3.0.3]#  iptables -vnL
Chain INPUT (policy ACCEPT 25424 packets, 11M bytes)
 pkts bytes target     prot opt in     out     source               destination
  758  124K ACCEPT     tcp  --  *      *       0.0.0.0/0            0.0.0.0/0            tcp dpt:1194
2423K  400M ACCEPT     all  --  *      *       0.0.0.0/0            0.0.0.0/0            state RELATED,ESTABLISHED

Chain FORWARD (policy ACCEPT 141 packets, 135K bytes)
 pkts bytes target     prot opt in     out     source               destination

Chain OUTPUT (policy ACCEPT 2101K packets, 113M bytes)
 pkts bytes target     prot opt in     out     source               destination

[root@haproxy2 3.0.3]# iptables -t nat -vnL
Chain PREROUTING (policy ACCEPT 1957 packets, 346K bytes)
 pkts bytes target     prot opt in     out     source               destination

Chain INPUT (policy ACCEPT 1935 packets, 343K bytes)
 pkts bytes target     prot opt in     out     source               destination

Chain OUTPUT (policy ACCEPT 11600 packets, 919K bytes)
 pkts bytes target     prot opt in     out     source               destination

Chain POSTROUTING (policy ACCEPT 11598 packets, 919K bytes)
 pkts bytes target     prot opt in     out     source               destination
    7   348 MASQUERADE  all  --  *      *       10.8.0.0/16          0.0.0.0/0

#启动openvpn服务
~]# systemctl start openvpn@server
~]# systemctl enable openvpn@server
Created symlink from /etc/systemd/system/multiuser.target.wants/openvpn@server.service to /usr/lib/systemd/system/openvpn@.service.

#验证日志:
[root@haproxy2 3.0.3]# tail /var/log/openvpn/openvpn.log
Thu Jun 27 09:54:31 2019 us=395615 MULTI TCP: multi_tcp_post TA_TIMEOUT -> TA_UNDEF
Thu Jun 27 09:54:31 2019 us=395627 SCHEDULE: schedule_find_least NULL
Thu Jun 27 09:54:41 2019 us=406001 MULTI: REAP range 80 -> 96
Thu Jun 27 09:54:41 2019 us=406071 MULTI TCP: multi_tcp_action a=TA_TIMEOUT p=0
Thu Jun 27 09:54:41 2019 us=406084 MULTI TCP: multi_tcp_dispatch a=TA_TIMEOUT mi=0x00000000
Thu Jun 27 09:54:41 2019 us=406096 MULTI TCP: multi_tcp_post TA_TIMEOUT -> TA_UNDEF
Thu Jun 27 09:54:41 2019 us=406107 SCHEDULE: schedule_find_least NULL
Thu Jun 27 09:54:51 2019 us=409360 MULTI: REAP range 96 -> 112
Thu Jun 27 09:54:51 2019 us=409433 MULTI TCP: multi_tcp_action a=TA_TIMEOUT p=0
Thu Jun 27 09:54:51 2019 us=409446 NOTE: --mute triggered...
windows PC安装openvpn客户端:
官方客户端下载地址: https://openvpn.net/community-downloads/
非官方地址:https://sourceforge.net/projects/securepoint/files/
openvpn客户端安装过程:按部就班即可
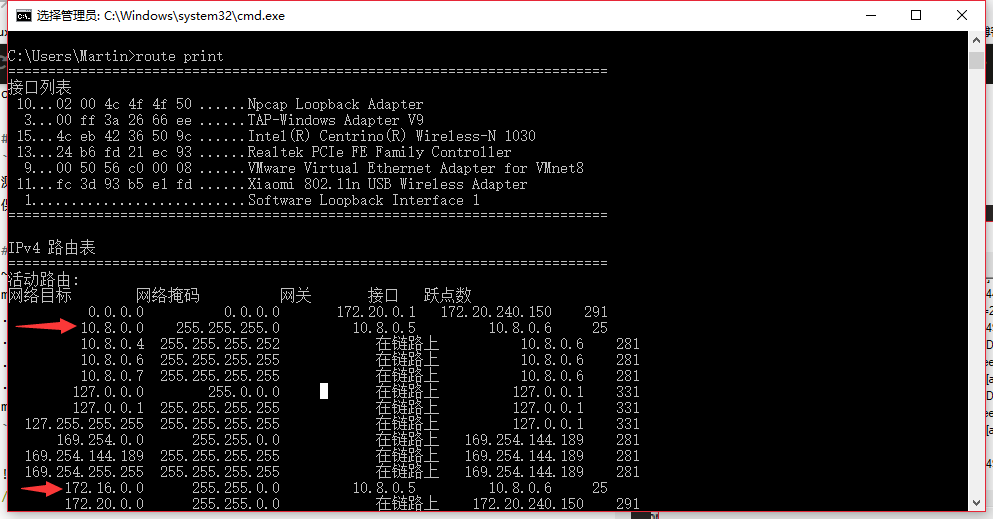
windows客户端测试连接:
测试下载版本为win10版。
保存证书到openvpn 客户端安装目录:C:\Program Files\OpenVPN\config

#在服务器打包证书并下载发送给客户端
~]# cd /etc/openvpn/client/zhangshijie/
martinhe]# tar czvf martinhe.tar.gz ./*
./ca.crt
./client.ovpn
./martinhe.crt
./martinhe.key
martinhe]# sz martinhe.tar.gz

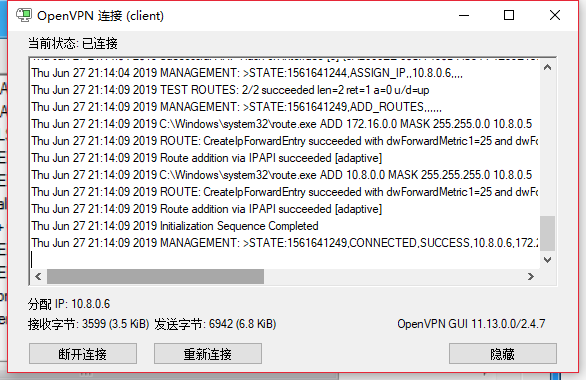
windows 客户端验证通信: